Felix Bot DApp demo
Now you have learned the basic knowledge of DApps development on CKB Layer1 with lumos. It's time to develop a slightly more complex DApp demo.
Felix bot is a telegram bot, created upon botgram and lumos. You can use felix bot to interact with CKB Layer1, send CKBytes red envelopes in a telegram chat group.In the development process,you can more intuitively understand the interaction between the client, back-end and CKB Layer1.

Figure 4 the architecture of felix bot
Project Structure#
The full code of felix bot dapp demo can be found here. Clone and open the project you will see the following files:
$ git clone https://github.com/zengbing15/felix.git$ cd felixfelix├── lib│ ├── data.js│ ├── server.js│ └── utils.js├── schema│ ├── UnsignedTransaction.mol│ ├── UnsignedTransaction.json│ ├── UnsignedTransaction.js│ └── UnsignedTransaction.umd.js├── package.json├── .gitignore└── README.mdPrerequisites#
Set up the Development Environment#
See Set Up the Development Environment.
Prepare three CKB accounts#
Create three accounts: Alice, Bob and Charlie,see Create CKB accounts. The payer is Bob and the recipient is Alice.
Specify Alice as the miner#
see Step 5. Get CKB capacity for the account of Alice
Use CKB-CLI to transfer some CKBytes to Bob#
$ ckb-cli --from-account <alice lock_arg> --to-address <bob address> --capacity <transfer amount> --tx-fee <0.01(defualt value)>Set up a telegram bot#
- Create a telegram bot, see 3. How do I create a bot?
- Send a list of commands to
BotFather
start - starthelp - helpset_receiving_address - Set receiving addressreceiving_address - Get receiving addresspending_envelopes - List of pending envelopes sent by mepay - Pay an envelopesend - send envelopesRun the felix bot#
Install dependencies#
$ npm installSet up the proxy server#
export https_proxy=http://127.0.0.1:10080;export http_proxy=http://127.0.0.1:10080;export all_proxy=socks5://127.0.0.1:10081Set up the BOT_TOKEN#
$ export BOT_TOKEN=<BOT_TOKEN>Set up the Configuration for Lumos#
The act of sending a red packet is actually transferring CKBytes which means a transfer transaction. You can use lumos to implement the transfer transaction, see Transfer-Tx DApp demo.
Set up the configure manager and indexer of lumos first.
const { Indexer } = require("@ckb-lumos/indexer");const { initializeConfig, getConfig } = require("@ckb-lumos/config-manager");process.env.LUMOS_CONFIG_FILE = process.env.LUMOS_CONFIG_FILE || './config.json'initializeConfig();const CKB_CONFIG = getConfig();
process.env.LUMOS_CONFIG_FILE = process.env.LUMOS_CONFIG_FILE || './config.json'initializeConfig();const CKB_CONFIG = getConfig();
const CKB_RPC_URI = process.env.CKB_RPC_URI || "http://127.0.0.1:8114";const CKB_INDEXER_DATA = process.env.CKB_INDEXER_DATA || "./indexer-data";const indexer = new Indexer(CKB_RPC_URI, CKB_INDEXER_DATA);indexer.startForever();For a sender, you can
- Send a red envelope, The number of
remainingcan't be exceeding the number of this chat group members.
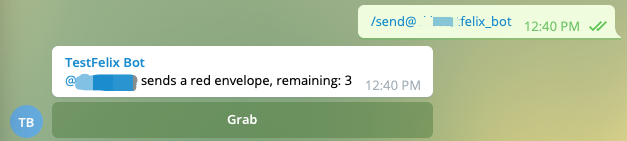
Figure 5 send a evelope
For a grabber, you can
- Set your receiving address: Charlie’s address
- Grab the red envelope
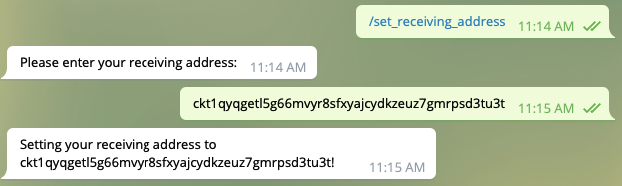
Figure 6 set the receiving address and grab the red envelope
Confirm the receiving address#
The prefix of "ckt" is means that the address is created on CKB testnet, see Address and Lock Script
Use parseAddress in @ckb-lumos/helpersto confirm the address.CKB_CONFIG.PREFIX means that the address prefix that should be entered.
const {parseAddress} = require("@ckb-lumos/helpers");
[DATA_RECEIVING_ADDRESS]: async (session, msg, reply) => { const address = msg.text || ""; try { parseAddress(address); } catch (e) { console.log(`Error parsing address: ${e}`); reply.text( `Please use a valid CKB address that starts with ${CKB_CONFIG.PREFIX}!` ); return DATA_RECEIVING_ADDRESS; } await storage.put(`address:${msg.from.id}`, address); reply.text(`Setting your receiving address to ${address}!`); return null; },When the grabber grabs the red envelope,felix bot can get the grabber's user.id and address.
async grab(receiverId, storage) { if (this.remaining() <= 0) { throw new Error("You are too late!"); } if (this.receivers.find((receiver) => receiver.id === receiverId)) { throw new Error("You have already grabbed one!"); } let address; try { address = (await storage.get(`address:${receiverId}`)).toString(); } catch (e) { throw new Error("Please click on me, and set your receiving address in a private chat!"); } this.receivers.push({ id: receiverId, address, }); }For a sender , you can
- Select a envelope to pay
- Enter the CKBytes to pay for the red envelope
- Enter the address used to pay for the red envelope: Bob’s address
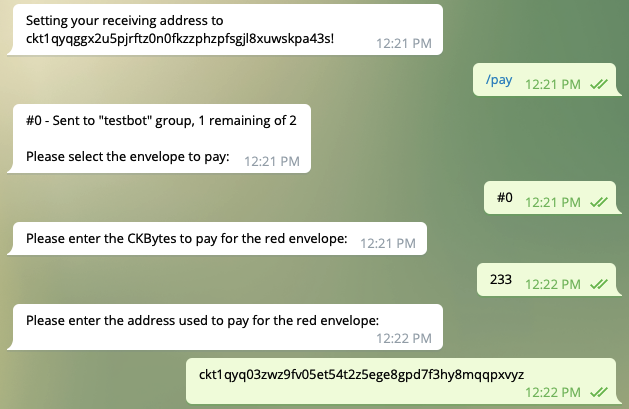
Figure 7 pay the envelope
Build the transaction skeleton#
Now enough information is obtained for the transfer transaction:the accounts info of two transaction parties and transfer amount.You can build the transaction skeleton:
- Create a transaction skeleton
- Add the transaction fee
- Prepare the signing entries
let txSkeleton = TransactionSkeleton({ cellProvider: indexer });    const fromInfos = [fromAddress]......
txSkeleton = await common.transfer( txSkeleton, fromInfos, receiver.address, currentAmount + BigInt(61) * SHANNONS, ); } //use `payFeeByFeeRate` to set dynamic tx fee txSkeleton = await common.payFeeByFeeRate( txSkeleton, fromInfos, FEE_RATE, ); txSkeleton = common.prepareSigningEntries(txSkeleton);Sign the transaction offline#
For security,transaction assembling and transaction signing should be separated. Felix bot is replyed the signing message.It’s recommended to use CKB-CLI to generate the signature by the signing message.
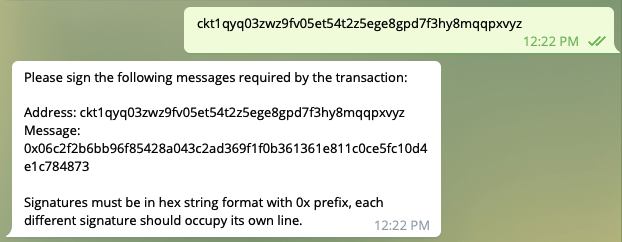
Figure 8 reply the message
const signingInfos = txSkeleton .get("signingEntries") .map((e) => { const lock = txSkeleton.get("inputs").get(e.index).cell_output.lock; const address = generateAddress(lock); return `Address: ${address}\nMessage: ${e.message}`; }) .toArray() .join("\n"); reply.text( `Please sign the following messages required by the transaction:\n\n${signingInfos}\n\nSignatures must be in hex string format with 0x prefix, each different signature should occupy its own line.` ); return DATA_PAY_SIGNING; },For a grabber, you can
- Sign the transaction
Use ckb-cli to sign the transaction.
- The CKB pre-built installer package includes the ckb-cli tool, see Download the CKB pre-built installer package.
- generate the signature
$ ckb-cli util sign-message --recoverable --from-account <bob lock_arg> --message <signing message>An example of a signature output:
Password: path: mrecoverable: truesignature: 0xd75d630994f862b43c52dc5dfd22306b9fec4112e751a5daf40fef7da0db05d7506a3494b63d7546dbdd2ea93af61f939d162fe7b8fe45da3ef929493a22762600Seal the transaction with the generated signature#
For a grabber, you can
- Commit the generated signature to felix bot.
 [DATA_PAY_SIGNING]: async (session, msg, reply) => {    const envelope = session[DATA_PAY];    const amount = session[DATA_PAY_AMOUNT];    const txSkeleton = session[DATA_PAY_ADDRESS];
    console.log(JSON.stringify(txSkeleton,null,2));
    const signatures = (msg.text || "").split("\n");    let tx;    try {      tx = sealTransaction(txSkeleton, signatures);    } catch (e) {
console.log(`Error sealing transaction: ${e} stack: ${e.stack}`); reply.text("Invalid signatures!"); return DATA_PAY_SIGNING; } Send the finalized transaction to the CKB network#
    const txHash = await rpc.send_transaction(tx);
reply.text(`Envelope successfully paid! TX hash: ${txHash}`); delete session[DATA_PAY]; delete session[DATA_PAY_AMOUNT]; delete session[DATA_PAY_ADDRESS];Felix bot will reply the transaction hash and UnsignedTx.json file.
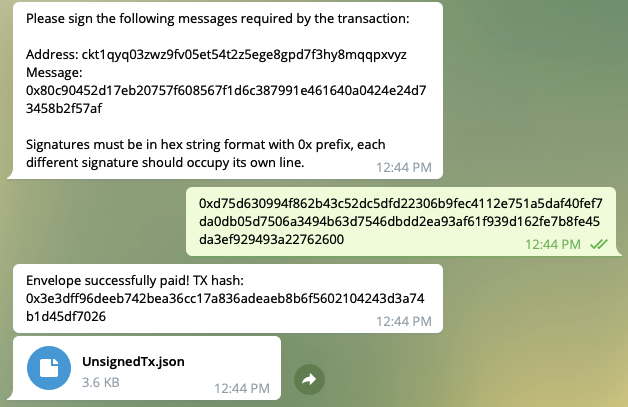
Figure 8 reply tx_hash and UnsignedTx.json file.